Editor overview
Once you click “Open Story Editor”, you will be in VNKit’s Story Editor. The bulk of work on your game will take place in this window - you will not have to use Unity’s menus much.
Before we go on -
An important note about saving your story
The changes you make in the Story Editor are auto-saved in
Assets/Resources/VNKitasStory.json(and others). Saving your overall Unity project doesn’t do anything to save your Story Editor content, so don’t worry about saving the Unity project regularly unless you are also making changes within the main Unity editor.Auto-save is triggered when you finish making a change in the editor and then click ‘away’ from that change. (ALPHA ALERT – In some rare cases VNKit might not autosave correctly, possibly when you close the window or change tabs; this should never lose more than one small change, but if you do find this happening please report it as a bug.)
👉 Please remember to back up your project files regularly! 👈
Press X to JSON
Your Story Editor will automatically load your project from
Story.jsonwhen you open it from the Unity Inspector window. Doing this also refreshes the Story Editor. If you have made changes to your VNKit project files externally (such as updating thestudio.axile.vnkitpackage folder, or editingStory.jsonin a text editor), you will need to close down and reopen the Story Editor to get VNKit to notice. (ALPHA ALERT – closing and reopening the editor should be your first instinct if you find a display bug or similar problem. Tell us about what you found, though!)
The first thing you will see is the Boards screen. This screen is where you will write, arrange and link the text, images and gameplay of your visual novel.
Most of your time in VNKit will be spent on this screen. When you’re ready to set up sprites, events, generators and general project settings, you can navigate to other parts of VNKit using the tabs along the top.
A handy tip -
On the top right of the screen, by the maximise/close buttons, there’s an ellipsis menu. From here, you can add a second tab to the Story Editor window. We recommend adding a Game tab so you can preview your game within the Story Editor. There aren’t on-screen play controls in this viewer, so use Ctrl+P/Cmd+P to play and stop the preview.
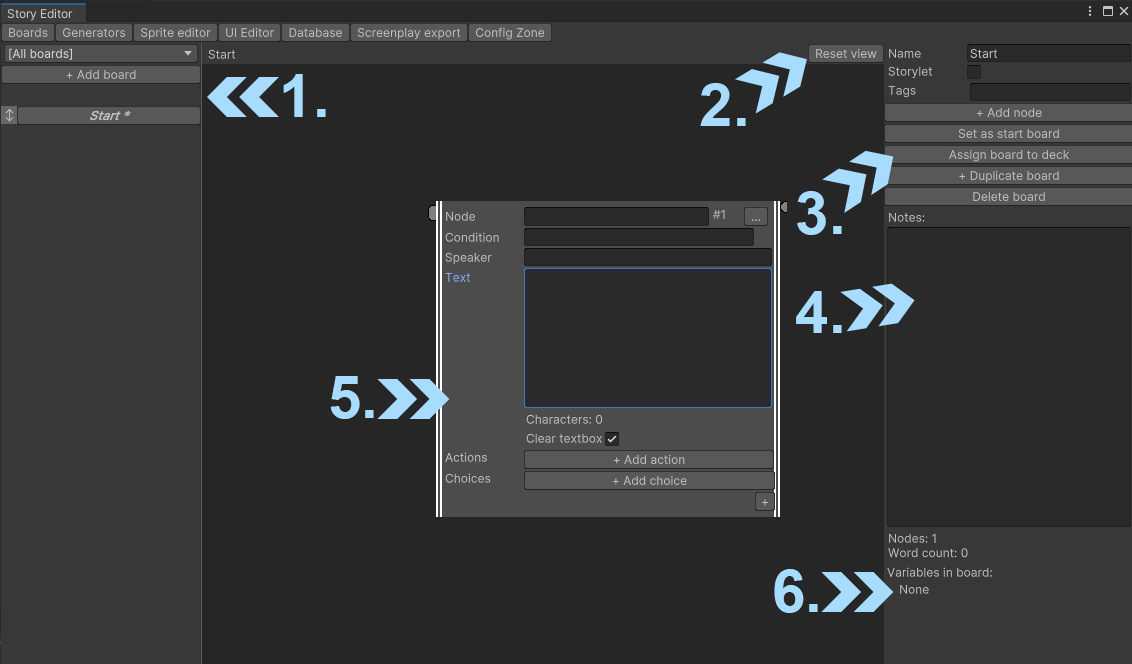
1. Board list
Allows you to create and manage Boards. You can think of a Board as a flat surface on which your Nodes are laid out - like a drawing board with index cards pinned to it, or a whiteboard with a flowchart diagram. You can add a new Board to represent a new part of the story, a new location for the player to visit, a storylet to shuffle into the game, or for any reason that makes sense to you.
The Board itself is displayed in the large window in the middle.
- The drop-down menu allows you to filter Boards by Tag and by Deck.
- Clicking
+ Add boardwill create a new board. - The Start Board is the board from which your game will begin running. The Start Board’s title is displayed with an asterisk
*next to it. - The Board with its title in bold italic is the Board you are currently editing.
2. Reset View
You can view other parts of the Board by dragging around on the backing area, and by using the mouse wheel to zoom. The Board goes on forever, so if you have panned too far away from your story, clicking here will return you to the central coordinate.
3. Board manager
From this menu, you can name the Board, change its behaviour and Tag, edit and delete it.
- The Storylet box allows the board to be summoned with the
Jump to storyletaction in the Action editor. Once checked, you will also be able to set conditions for the Board. When you use theJump to storyletaction, it will take you to a random Storylet which fits the game’s conditions. - Tags let you label Boards, and you can use them as a filter in the dropdown menu in the Board List. Tags can contain spaces, and anything else you like, but only one Tag can go in each Tags box. If a board is a Storylet, you can also jump to it based on its tags. (See Storylets for more information.) (not done yet - Ed)
- The
+ Add nodebutton adds a Node. You can also add a Node by right-clicking on the backing area in the Board view window, and choosing ‘Add Node’. Set as start boardmakes the current Board being worked on the Start Board. This is useful for testing parts of your game individually.Assign board to decklets you add the Board to a Deck, a collection of Boards. You can then filter by Deck in the Dropdown menu, or draw Storylets from a specific Deck.+Duplicate boardcreates a copy of the Board in your current Deck.Delete boarddeletes the Board.
4. Notes
Use this to keep notes for yourself about the project. You can use it to note down values of coordinates, log any scenes that need to be done, and anything else useful.
5. Node
Nodes are the building block of a VNKit game. They will store text the player will actually see, display images and music, remember and reference variables, and will follow after each other in the order they are linked together. For more about them, see Node overview.
6. Statistics
Displays the number of Nodes in the project and the total word count.
The ‘Variables in board’ list displays the names of the variables used in the Board - this helps you remember what you called your Variables when referring to them for Conditions or Actions. Next to each Variable, a little coloured chip is displayed. These coloured chips will display on any Nodes that have each variable, allowing you to quickly reference where they are used on the Board.