Setting up VNKit
ALPHA WARNING!
This page describes something that will be heavily revised in later versions. The release version of the software will not be this annoying. Please use this as reference for the Alpha version in the meantime.
Part 1 - Getting your Unity project up and running
- Download and install the Unity Hub.
- Open the hub and install a version of Unity; the current recommended version is Unity 2020.
- In the Unity Hub, create a new project. When asked what kind of project you want to make, select 2D.
- You will have to wait for Unity to create the project, which will take some time (about 2-5 minutes). Take the opportunity to grab a cup of tea, if you like.
- Download the VNKit package, and extract it to a new folder using whichever software you prefer (e.g. Microsoft’s inbuilt Compressed File tool, PeaZip, 7Zip, etc). Once extracted, copy the
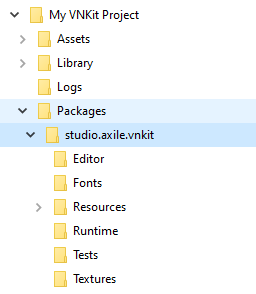
studio.axile.vnkitfolder into the Packages folder of your new project. (Don’t forget - you can quickly open a window for it by selecting your project in the Unity Hub list, then choosing ‘Show in Explorer’ (Windows)/ ‘Reveal in Finder’ (Mac).) Once you’ve moved the package into your Packages folder and gone back into the Unity editor window, a progress bar window should appear.
If you don’t see one, double-check your folder structure, and make sure it looks like this:
Part 2 - Putting VNKit into your game
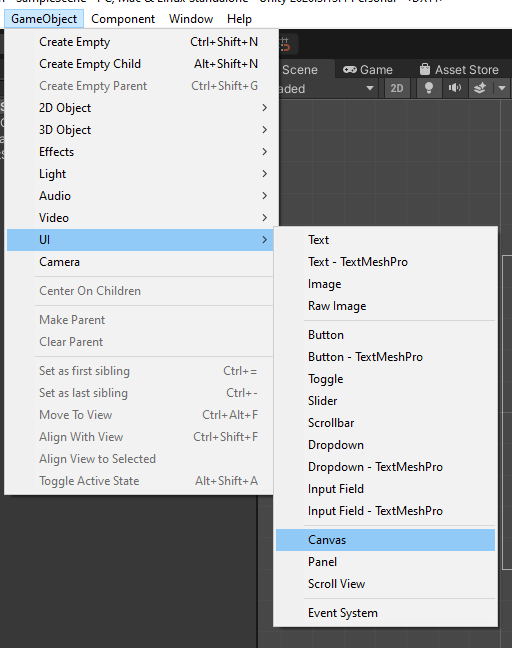
You will be taken to a new Scene. Create a Canvas inside of your Scene. To do this, click the GameObject menu, then find UI>Canvas.
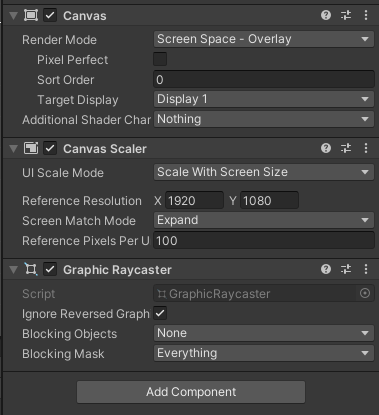
- Click on the Canvas object in the Hierarchy, and then look in the Inspector. Check:
- the Render Mode is set to “Screen Space - Overlay”,
- the Canvas Scaler UI Scale Mode is set to “Scale With Screen Size”,
- the Screen Match mode is set to Expand.
You will now need to give Unity a frame of reference for the size of VNKit.
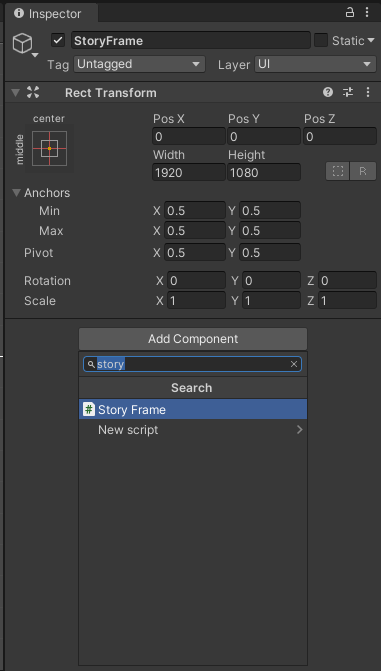
- In the Inspector, change the Canvas Scaler Reference Resolution to an appropriate size and aspect ratio for a virtual screen. (Note that this is different to the actual, physical resolution of your game when on devices - it’s a reference size used internally. Your game will display correctly on bigger or smaller screens.) If you’re not sure what to use here, set it to X 1920 Y 1080.
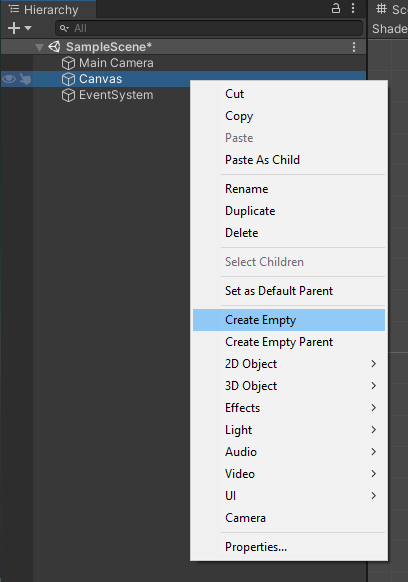
Right click on the Canvas that you have just created in the Hierarchy. Select ‘Create Empty’ from the menu that appears. (Optional - you may want to rename the Empty to something appropriate, like ‘VNKit’.)
While the Empty you have just created is selected, look for the Add Component button in the Inspector window. Click this, and add a StoryFrame. (You can find this more easily by typing ‘story’ in the Search box above the component selection window.)
You will now link up your StoryFrame to the size of the canvas. In the RectTransform section on the top half of the Inspector window, set the StoryFrame’s Width and Height to the same dimensions that you used for the Canvas Scaler Reference Resolution (e.g. 1920x1080). Now VNKit will be the same size as the game screen, and scale correctly for large or small screens.
- Save the Scene.
Click the StoryFrame in the Heirarchy. In the Inspector, you can now click “Open Story Editor”.
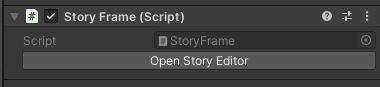
This will open a new window containing everything you need to build a visual novel with VNKit!