Sprite Editor
The Sprite Editor allows you to configure the characters and visible objects that will appear in your game. Once you’ve created some sprites in the Sprite Editor, you can add them to your scenes using the AddSprite action.
Anatomy of the Sprite Editor
![]()
The left-hand panel shows a list of sprites already configured in your project. Clicking on one of these will open the sprite in the editor.
The centre panel shows the currently-selected layer of the sprite. For simple sprites you may only want to use one layer, but more complex characters with varying facial expressions, poses, and outfits, may need multiple independent layers to be configured. At the top of this section is the layer name, and an offset that can be used to control where the layer’s images appear on the sprite; for example, if your character sometimes wears a hat as part of their outfit, your “Hat” layer might have an offset of X: 0, Y: 450. Layer offsets are given in pixels, where 0, 0 is the centre of the sprite, X goes from left (negative) to right (positive), and Y goes from bottom (negative) to top (positive).
Tips for working with layers
Every frame belonging to a layer will always be placed at the same coordinate, but sometimes frames might be significantly different shapes and sizes. The easiest way to handle this is to make sure that each frame image has the same dimensions as your entire base sprite, even if most of the image is therefore empty. There is no need to worry about file size, because a large area of transparent pixels will compress virtually to nothing when the PNG is saved.
“My layers are a different size to the base image and positioning them is a pain!”
Try making a temporary Start node that displays the sprite with the relevant layers showing, then Play your game. In the live preview (in the Unity editor itself), you can then drag the layer into position using the mouse. When it looks good, take a note of the coordinates displayed in the inspector - you can then use that as the position of the layer in the Spite Editor.
Importing sprites
(To do)
Setting up multiple states
Below the offset you can see a list of the states (animations) belonging to the layer. You can select a state by clicking on it, or click the “+ Add state” button to add a new state. Right-clicking a state will allow you to rename or delete it.
When a sprite is selected, the right panel will show the basic information belonging to the sprite:
- The sprite’s Name can be changed here.
- A default Scale can be defined; this can be useful if your images are bigger than the size of the (virtual) game window, and need to be shrunk down.
- An audio Blip can be set here, which will play when the game is displaying a line of this character’s dialogue (if the text transition mode is set to “Typing”; see the Config Zone section).
- A Notes section is provided for general annotations, reminders and developer commentary relating to the character or sprite; this will not be visible in-game.
- Underneath the Notes section is a list of layers. Layers can be added, removed and reordered here. Layers appearing higher in this list will be displayed on top of lower layers when the game is running. It’s not possible to reorder layers at runtime.
- The Delete sprite button will show a confirmation window before deleting the sprite from the game data.
- The Appearances section shows a list of boards on which this sprite appears, which can be useful for debugging and analysis.
When a state is selected in the centre panel, the content on the right-hand side changes:
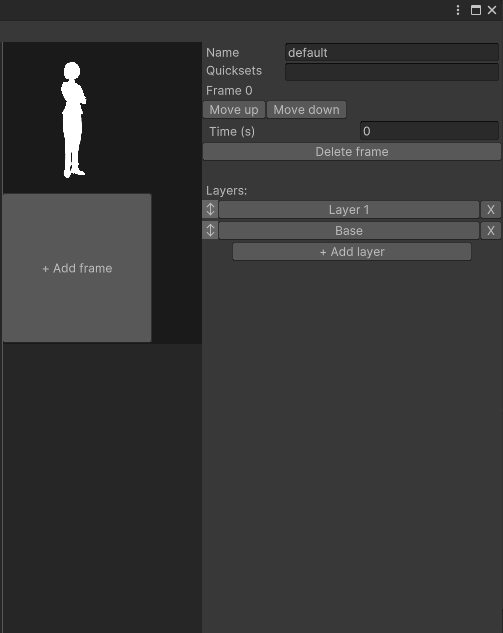
Next to the info panel there will be a list of the frames in the state’s animation cycle. The infobox on the right shows the name of the state, and also its Quicksets. These are “collections” of states that can be used to easily switch out multiple parts of complicated sprites; for example, if a character has several outfits that consist of a top, bottoms, shoes, and optional accessories, each of these outfits could be assigned its own quickset, and Set Sprite State actions used to pick between them in-game.
If a frame is selected, the frame number will be shown here, and the Move up and Move down buttons can be used to reorder the frames.
The Time field is used to control the speed of the animation, by setting the duration of each frame in seconds.