Step 6 - Adding images and sound to your game
Media files you use in VNKit will need to be imported into Unity’s inbuilt Resources system before you can use them.
a) Background
We’re going to start by adding a background image to your game.
Close the Story Editor.

In Unity’s Project window, navigate to Assets > Resources > VNKit > Backgrounds. This will open up the Backgrounds folder for your game. Drag and drop your background image into the Backgrounds folder, from your file explorer window.
For those using pixel art:
In this walkthrough, we’re using a photo background, so Unity’s default settings are fine. However, if you’re making a game using pixel art, you will find that your images are unacceptably blurry.
If you are having this problem, highlight your image in the Project Assets window, then look at the Inspector. Change the Advanced > Filter Mode setting to “Point (no filter)”. Your images should now have pixel-perfect scaling.

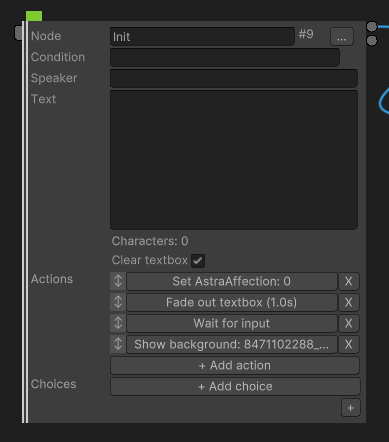
Once you’ve added the background image to the Backgrounds folder, you can add it into your game. Re-open the Story Editor (you might need to click on the VNKit Canvas in the Hierarchy window to get the Open Story Editor button back). Go to your first node (the Init), click Add Action, and add:
- The
Hide Textboxaction (in the “Textbox” section). When we preview the game, the textbox will display by default, unless we are using Hide Textbox to get it out of our way. This will help us see the position of the assets better. The Fade parameter lets us set a fade time, but don’t worry about it for now - this is just for testing. - The
Wait for inputaction (in the “Variables and events” section). This will cause the game to wait for a click before progressing onto the next node - if we don’t use it, the game will flow straight through into Astra’s first line, bringing the textbox straight back up again to block our view. There aren’t any parameters on this action. - The
Set Backgroundaction. (It’s in the Backgrounds section.)
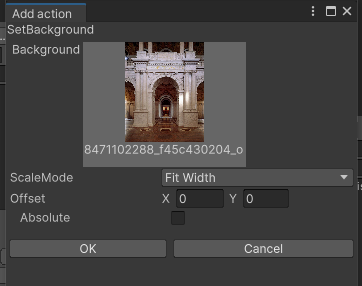
Here you can see all of the backgrounds that you have added to the project folders. Click the one you want to use.
The ScaleMode parameter determines how the background will be displayed. Fit Height will fit the background to the height of the screen, and the Width will be ignored. Fit Width displays the image at the same Width as the screen and ignores the height. Cover automatically scales the image to cover the whole of the screen, keeping the aspect ratio intact - this will be the most common parameter for typical projects. (Note that none of these options distort or stretch the image!)
The photo we are using here has a tall aspect ratio, while our game is in a wide aspect ratio. Therefore, some of our background is going to be cut off. We can use the Offset parameter to shift the image around so we see the correct part of it.
Handling coordinates
The Offset parameter in Set Background allows a background image to be placed at the coordinates on the screen that you choose, using the centre of the image as the reference point, or anchor. You can imagine the background as a printed photograph with a drawing pin in the exact centre, and the screen as a notice board - the coordinate you supply is the exact point on the board the pin will be stuck into.
VNKit has two kinds of coordinates that it understands.
The default mode is relative coordinates. Here, each axis extends from -1 to 1, with 0 in the middle. This allows you to place an image on the screen proportionally, without having to worry about the exact pixel location. (For example, if you know you want a character’s sprite to be displayed about a third of the way across from the left of the screen, you can place the sprite at X: -0.33.) The other mode is absolute coordinates. This lets you place an image at an exact pixel value, for when perfect precision is needed.
[diagram goes here]
For our background image, we don’t need perfect precision - we just want most of the floor to be in shot. So we’ll set the coordinates as X: 0, Y: 0.6. This gives a good result when the game is previewed:

This same coordinate system is used for displaying sprites as well. Let’s put Astra on the screen.
b) Sprite editor
- Where to import sprites
- Anatomy of the sprite editor
- Set up Astra’s states
- Oh no! What if I want to use layers??
[add Preview section! add TMP message!]
- Putting Astra’s sprite on screen
c) Music
- Where to import music
- Music action commands